Workshop registration
Map how a visitor finds a workshop and books a place. Start with the example, then add the page where visitors choose a workshop.
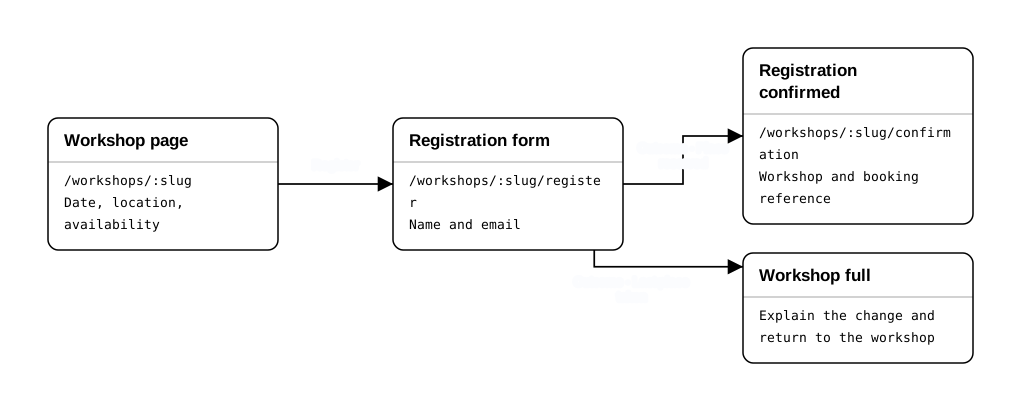
Map the website journey
A page flow follows one visitor goal. Use a box for each page or screen the visitor sees. Label each arrow with what the visitor does or what happens next. Here, the goal is to choose a workshop and book a place.
- Add the starting page. Open the example and choose Diagram → Add page. Enter Workshops as the page name and
/workshopsas its route. Choose Apply changes. This page lists the workshops visitors can choose from. - Connect the pages. Choose Diagram → Connect pages…. Set From to Workshops and To to Workshop page, then choose Connect.
- Name the action. Select the new arrow labeled Open page and choose Diagram → Edit selected…. Change Action name to Choose a workshop and select Apply changes. To find the arrow on a small screen, use Diagram → Find items… and search for Open page.
- Check what happens when the form has an error. Select Registration form, choose Diagram → Edit selected…, then open Page states (2)… → Invalid email. The form keeps what the visitor typed and shows an error on the same page. A successful booking follows the arrow to Registration confirmed.
For your own website, pick one visitor goal, find a starting page, and trace the actions to the result. Then check which problems need a different screen and which can be handled on the same page.
Share the design
Edit a requirement and export the handoff
- Edit a requirement. Choose View → Requirements review → Register for a workshop. Add “The confirmation page shows the workshop date” to Intended outcome, then choose Save requirement.
- Export the handoff. Choose File → Export → Advanced. Set Format to Markdown handoff and Project content to Workshop registration · Website handoff. Save to a project folder or download the ZIP. Open
docs/architecture.mdand follow the links to the requirements, diagrams, and decision record.